Of course, our program is very simple to use. You can easily and intuitively understand which are the steps to follow when starting its usage. Despite this, we decided to write a brief instruction for those ones who are newbies with proxy usage and do not know how to begin. First of all please select what type of user you are:
- 1. First off start the program, it will be automatically minimized to the tray. In the lower right corner of the desktop (near the clock) you will see an icon (globe) (EXAMPLE Windows XP, EXAMPLE Windows Vista, EXAMPLE Windows 7).
- 2. Open the menu by pointing the mouse on the program icon (globe) and press the RIGHT mouse button on it. In menu click the 'Program preferences...' (EXAMPLE)
- TIP: You can also call the 'Program preferences...' by pressing the shortcut: CTRL + SHIFT + P.
- 3. Switch the program to use our premium VIP service. To do this, click on the related switcher (EXAMPLE). Now enter your VIP code in the 'Your VIP code' box.
- TIP: If you're a beginner, leave default settings. By default, the program is already using the most optimal values, they will suit you in 9 out of 10 cases.
- That's all, now you can download fresh proxies from our server by selecting - 'Download proxy servers' in program menu. As alternative you can do the same operation with shortcut: CTRL + SHIFT + R.
- 1. First off start the program, it will be automatically minimized to the tray. In the lower right corner of the desktop (near the clock) you will see an icon (globe) (EXAMPLE Windows XP, EXAMPLE Windows Vista, EXAMPLE Windows 7).
- 2. Open the menu by pointing the mouse on the program icon (globe) and press the RIGHT mouse button on it. In menu click the 'Program preferences...' (EXAMPLE)
- TIP: You can also call the 'Program preferences...' by pressing the shortcut: CTRL + SHIFT + P.
- 3. Switch the program to use your own URL. To do this, click on the related switcher (EXAMPLE). Enter the URL of the page that contains the list of proxies.
- That's all, now you can download fresh proxies from our server by selecting - 'Download proxy servers' in program menu. As alternative you can do the same operation with shortcut: CTRL + SHIFT + R.
- 1. First off start the program, it will be automatically minimized to the tray. In the lower right corner of the desktop (near the clock) you will see an icon (globe) (EXAMPLE Windows XP, EXAMPLE Windows Vista, EXAMPLE Windows 7).
- 2. Open the menu by pointing the mouse on the program icon (globe) and press the RIGHT mouse button. Click the 'Edit proxy server list'.
- 3. You can add new proxy from a new line in the format A.B.C.D:PORT or load proxies from a file. After that, you will need to click the 'Save settings' button.
You can see the available list of proxies in the menu under the section 'Select proxy server' (EXAMPLE). It's enough to click once on any proxy server and it will be automatically installed on your browser. You can quickly disable or enable proxy usage by clicking on the program icon (globe) with your LEFT mouse button. Please note: if the globe is blue and spins, then the proxy usage is enabled, if it's not spinning and gray the usage of proxy is disabled.
Most likely, you will see this message if you try to close the window with proxy checker while the checking process is active. To be able to close this window you have to stop the checking proccess first, by clicking the 'Stop scan proxy'. Maximum in 5 seconds the checking process will be stopped and you will be able to close the window
Once you have completed proxy check, you can remove the proxy servers which are marked as dead ones. If you decide to remove them, they will be removed permanently. But if you accidentally delete the proxy and you do not want to save the results, click the 'Cancel result'.
Since our premium proxy switcher creates a local proxy server running on 127.0.0.1:8080 address at startup, you can not run two copies of it. The same port can be used only by one copy of our software. You can read more about what is port at our forum.
First of all make sure that you specified proxy servers in proper format. If your local proxy server requires authentication, then you should add its user and pass. Here are two samples: 192.168.0.1:3128 or with login and password user:pass@192.168.0.1:3128. This IP address 192.168.0.1 and port 3128 are shown as an example. Do not try to use them, they will not work. If you are an unexperienced user, you can always contact us and we will help you to setup everything.
Such in case, you can always contact us. We consider the problem of each user individually and we are doing our best to find solution for each of you. It does not matter whether you are our VIP subcriber or not, as we are always happy to help you out.
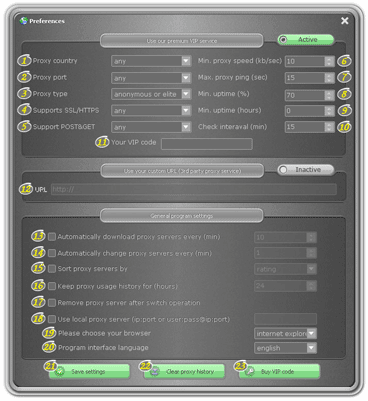
Screenshot #1
#1 Proxy country – Please select proxy server's country from the available country list. This list is updated every minute so if there is no desired country at the moment, please wait and try again.
#2 Proxy port – Here you can specify the port of the proxy server. You would need this filter if you have some restrictions on your computer and you can not use proxies with non-standard ports (80, 8080, 3128).
#3 Proxy type – 3 types of proxies are always available: transparent, anonymous and elite. In the most cases, anonymous or elite will suit you; though in some cases even transparent will be enough for you. More information about the types of proxies you can get by reading this very informative article here.
#4 Support SSL/HTTPS - This parameter is responsible for checking whether the proxy server supports SSL protocol or not. This protocol is used by browser when it opens web addresses started with https://.
#5 Support POST&GET – It's very rare when proxy server does not support POST&GET methods. Our practice has shown us that in 99% of the cases there is no need to set the value yes/no in this filter, leave default value. This method (POST&GET) is used when you are logging in or adding messages to guest books, forums, etc.
#6 Min. proxy speed (kb/sec) - You can set the minimum speed that proxy server must have. The optimal value is between 10 and 30 kb.
#7 Max. proxy ping (sec) – This parameter is responsible for the actual delay in seconds that proxy has while conecting the server where the website is located. It's strongly recommended not to change the default value or even worse, trying set it lower than 5 seconds.
#8 Min. uptime (%) – The value can be vary between 1 and 100. The higher the number, the more stable proxy is. The optimal value is between 70 and 90.
#9 Min. uptime (hours) - This option was added recently by the request of our customers. For some projects it is necessary to use only very stable proxy servers, which are 'alive' from several days up to several months. So here you can specify how many hours the proxy's uptime should be. Let's say 48 hours means that the proxy is working none stop during last two days and there are high chances that it won't get down tomorrow.
#10 Check interaval (min) - This option is only available in our proxy switcher, this innovation, it helps our users to choose between quality and quantity. The value can vary between 1 and 360 minutes. For example, if you choose 20, you will receive all proxies that have been tested and labeled as working ones for the last 20 minutes from the moment of the request. The greater the interval, the more you get proxies but the quality will be lower, and vice versa (this option is only available on our website)
#11 Your VIP code - This VIP code you can buy from our web site. It will give you an access for a month to our magnificiant proxy database. At the moment there are over 80,000 different proxies in our main database, which are refilled on hour bases!
#12 URL - In this field you must specify the address of a page with proxy servers. It doesn't matter you're our VIP member or you haven't bought anything from us, you still can use our software for FREE. We will not limit you in anything, even more, you will have the same rights and options as our VIP subscribes have. We have added a proxy checker which will help you remove dead and slow proxy servers and get the same quality proxy list as our VIP member have. We will speak about this how to use proxy checker later.
#13 Automatically download proxy servers every (min) – Only our proxy switcher offers the option to specify the period in minutes when you want the proxies to be downloaded automaticly. Put 1-5-10 minutes, and our software will automaticly download the list of proxies every 1-5-10 minutes and so on. And it doesn't matter where to download proxies from, it works fine with our VIP zone and with any third party proxy source
#14 Automatically change proxy servers every (min) – Now you can tell Premium Proxy Swithcer to change the proxy server automaticly after every specified period of time. It is very usefull and important in relating to your anonimity. Just imagine, your virtual IP address (which is used to identify your location) will be frequnetly changed!
#15 Sort proxy servers by - Since many users need help with selecting stable and fast proxies, we have added an option to sort proxy servers by rating. Also at the request of many of our users we have added the ability to sort proxies by country or by port
#16 Keep proxy usage history for (hours) - This function is intended for certain types of projects. Suppose you use a proxy and do not want it to be reused for the next 24 hours. It is sufficient to enable this feature and specify 24 hours as a time of history. All used proxies will not be displayed in your list for the next 24 hours. Only after this period of time, they will again appear in your list. In fact, if you need only unique proxy servers in the next few hours/days, then this option is for you.
#17 Remove proxy server after switch operation – We think that this option is clear, but still. By selecting this function, the current proxy will be automatically removed from the list when you will switch to the different proxy. This function is useful in combination with option to change proxy automatically.
#18 Use local proxy server (ip:port or user:pass@ip:port) - This function is intended for advanced users. You can be assured that you will not find no other proxy switcher which would have the similar and at the same time such a very useful function. This brings anonymity on a new level – you can create a chain of proxy servers! Also, if before you used to access the Internet through a local proxy and accordingly you could not set your own proxy in browser, with Premium Proxy Switcher it became possible. Now it is sufficient to specify a local proxy (even if it supports authentication) or your own proxy server and your computer will use chain of 2 proxy servers for any further connection.
#19 Please choose your browser - Our proxy switcher works with the 5, the most popular browsers. Select the one for which you would like to use it.
#20 Program interface language – Our software is currently translated into six languages and we are planning to add even more in the nearest future. If you wish, you can help us to translate our software into your native language.
#21 The button 'Save settings' – by clicking on this button, you save the changes you just made.
#22 The button 'Clear proxy history' - If you want to clean up the history of the used proxies, then click on this button. This action is necessary when you want to run proxy history from the beginning
#23 The button 'Buy VIP code' - If you want to renew your existed code or buy an access to our premium VIP zone, click on this button. Please note, you can click on it at any time you want.
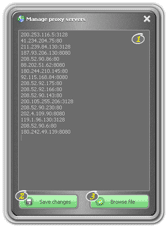
Screenshot #2
#1 - In this window, you can manually enter new proxy servers from a new line in the following format A.B.C.D:PORT. Also in this window you can see proxies you entered ealier. Please note that you can not edit proxy list downloaded nor from our VIP premium area neither from third party source.
#2 The button 'Browse file' – with help of this button you will get ability to load proxies from the local file.
#3 The button 'Save changes' - by clicking on this button, all changes made to the proxy list will be saved. You will see all available proxy servers at the top of the list - 'available proxy servers'
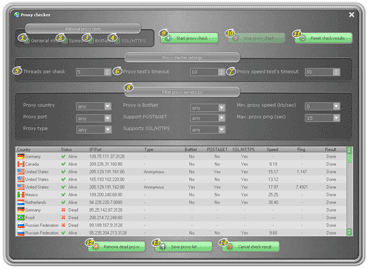
Screenshot #3
This section is responsible for the enabling additional tests that the proxy should pass. If you want to check proxy list only for the status 'dead or alive', then you can uncheck all the checkboxes.
#1 General info. - This test obtains general information about the proxy server: type and ping
#2 Speed - If you want to determine how fast each proxy server is, then you need to include this type of checking. It is always advisable to check the proxy for the speed, because this parameter is very important to determine the ranking and the quality of the proxy.
#3 BotNet – Try to avoid using this type of proxy servers. Of course, in some cases, the proxy may be falsely labeled as BotNet, but this happens very rarely. If you have downloaded a proxy servers from our premium VIP access, you can easily disable this type of test.
#4 SSL/HTTPS – You should enable this test only if you need proxies that supports the SSL protocol. This protocol is used to open web websites that begins with https://
#5 Threads per check - How many proxy servers should be checked simultaneously. The optimal value is from 5 up to 10. Do not try to put a high value, it may affect on quality of proxy checking. Although, everything depends on the quality of your internet connection and your PC.
#6 Proxy test's timeout - Maximum time in seconds, which is allowed to spend on each of the tests with exception of speed test.
#7 Proxy speed test's timeout - Maximum number of seconds that can be spent on speed test. We do not advise you to reduce the value, since it makes the proxy speed test results inaccurate.
#8 - This filter section lets you select proxy servers from available list. All the parameters are similar to those ones which were already described in details in the 'Use our premium VIP service'. This filter section was added for those users who is using third party proxy servcies which does not supports soritng or filtering proxy servers.
#9 The button 'Start proxy check' – This button starts proxy check
#10 The button 'Stop proxy check' – This button stops proxy check
#11 The button 'Reset check results' - A button that clears the results from previous tests. Though when you run proxy checker, all proxies will be re-checked and re-ranked accordingly, so this button is about to loose its relevance.
#12 The button 'Remove dead proxy' - Once you have checked the proxy servers, you can remove the dead ones from the list (they will be removed permanently).
#13 The button 'Save proxy list' - You can save the test result. When you press this button, it will recalculate the rating for each proxy. Old proxy rating will be lost.
#14 The button 'Cancel check result' - Cancels the check results and closes the window.
World Time:
Premium Proxy Switcher - a professional proxy software to manage your proxy list
Created and developed by software developers team 'Izzy Schlossberg and Co'
Terms and Conditions of Service. Copyright 1999-2024. All rights reserved
Created and developed by software developers team 'Izzy Schlossberg and Co'
Terms and Conditions of Service. Copyright 1999-2024. All rights reserved


